DIY Minky Baby Blanket
- Jen

- Jul 23, 2019
- 2 min read
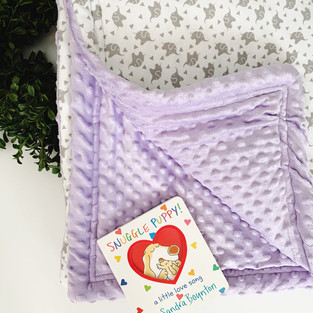
Ever since one of my cousins had the first great-grandchild in the family, I started the tradition of sewing a baby blanket for each of the kids with their names on it. I've now made four and I have more to go! I learned how to make these by watching a YouTube video and it was surprisingly easy and very fast! If you're descent with a sewing machine you could probably pull it together within a half hour. I will walk you through my #Minkyblanket tutorial below!

Materials:
Cotton Print Fabric - 1 Yard
Minky Dot Fabric - 1 Yard
Batting - 1 Yard
Sewing Pins
Sewing Machine
Thread
Scisors
Regular Sewing Needle
To begin, place your two fabrics one on top of the other, right sides together, then place your batting on top. Once you have them flat, trim your edges and make sure your corners line up evenly on all your pieces of fabric. Then pin all the way around, leaving about a 6 inch gap that WILL NOT be sewn until the end. This gap will be used to turn the fabric right side out.
Next you will sew all around using a 1/2" seam allowance. Be sure to back stitch on both ends of the 6" gap to ensure it's secure. Otherwise, when you go to invert the blanket it could come loose.
Next you can clip all the corners to reduce the bulky fabric. Then invert the entire blanket so the right sides are facing outwards. Go ahead and stitch the 6" gab you left around the edge so the entire edge of the blanket is secure. Then you can steam press the entire blanket to get a nice pressed seam.
Now, topstitch 1/4″ seam allowance all around. I chose to topstitch twice because it’s extra secure and I think it makes the blanket look nice.
Once I was done I created a heat transfer decal with my #cticut of each name and added it to the corner. I thought it was a cute way to make these blankets even more personalized, and everyone loved them. It's a quick and easy way to make a baby gift extra special. Below are a few of the blankets I've made so far!
Let me know if this tutorial was helpful to you. I'd love to hear your feedback, or see your creations! If you have any questions, feel free to comment below, or send us a message!
Thanks for reading!


Comments